
Have you ever struggled to keep your app’s strings in sync across iOS, Android, and other platforms? Managing translations can quickly become a nightmare.
This blog post describes a solution which we landed on to manage strings across different platforms, and different targets (apps). The goal was to have a single file, containing the strings for all platforms and targets. I wanted a change in that text file to automatically be reflected in all multiplatform projects, without the developer needing to think about the differences.
So let’s start off with Twine. Twine is a tool that helps solve this problem by allowing you to define your strings in one place and generate native resources for multiple platforms…
Twine#
Twine is a long-standing open-source project, having been around for about 14 years, which manages strings.
Twine is a command line tool for managing your strings and their translations.
You write your strings in a text file, which according to the repo, is based on the old Windows INI file format. For the younger developers out there, it’s kind of similar to TOML (but simpler).
In the simple usage, the file looks like this:
[[General]]
  [yes]
    en = Yes
    fr = Oui
    ja = はい
  [no]
    en = No
    fr = Non
    ja = いいえ
Here, we’ve declared two strings: yes and no with translations for en, fr and ja languages.
The [[General]] header at the top is for allowing you to group strings into logical groups, but you could just use a single group.
You can go more complex, by using some of Twine’s more complex features:
[[Escaping Example]]
  [list_item_separator]
    en = `, `
    tags = mytag
    comment = A string that should be placed between multiple items in a list. For example: Red, Green, Blue
  [grave_accent_quoted_string]
    en = ``%@``
    tags = myothertag
    comment = This string will evaluate to `%@`.
Here you can see some more advanced features:
- Tags
- Comments (hopefully obvious what it does)
- Escaped strings
Why Twine?#
So why use Twine for managing strings in a multi-platform project? Whilst there’s many tools out there for managing strings, I like Twine as it feels like a tool which keeps everything simple.
Not to minimize what Twine provides, but as a simple explanation: it reads a text file, and then outputs string files in formats which can be read natively on various platforms. You can see the full list here, but for our purposes, it’s important that it supports Apple Localizable, and Android String resources.
Keeping it Native#
We’ve learnt that Twine is a tried and tested solution for managing string resources, but you might be wondering if it is useful when there’s already a bunch of solutions for multi-platform development out there?
Simple answer, yes! By exporting to the native format on each platform, we can ensure that performance is kept as high as possible, and reduce the chance of bugs. This approach shifts translation processing to compile-time, reducing runtime overhead and potential errors, and it fulfills our goal of developers not needing to do anything.
So let’s get started…
Install Twine#
To use Twine we have a few options:
- Install it via RubyGems:
gem install twine - Build a
jarexecutable of Twine with JRuby, and use it like any other Java executable.
Which option you use depends on how difficult it is for you to deploy a working Ruby environment for all of your developers. Apple developers tend to be comfortable with Ruby, as CocoaPods, Fastlane, and other popular tools, all require Ruby environments.
Android and JVM developers are unlikely to have a Ruby environment, or want to manage one in the future. For this reason, we went down the path of building a JAR executable, meaning that the only thing needed to run Twine is a Java Runtime Environment (JRE).
You can see some instructions on how to build Twine via JRuby below:
Building Twine with JRuby#
To build Twine with JRuby, we can do the following:
Checkout Twine
git checkout https://github.com/scelis/twine.git ~/dev/twineSetup a JRuby environment. I’m using rbenv:
# Install rbenv and ruby-build via your system package manager.
# I'm using Homebrew but most packages managers have these.
brew install rbenv ruby-build

# Install jruby-9.4.9.0 (latest available on ruby-build as of publication)
rbenv install jruby-9.4.9.0

# Install Warbler (this creates the jar)
jruby -S gem install warbler
Now build Twine
cd ~/dev/twine # Or wherever you checked it out

# Set JRuby as our local Ruby env
rbenv local jruby-9.4.9.0

# Finally, compile our JAR
warble compiled runnable jar
At this point, you’ll have a twine.jar ready to use. Test it out by executing it:
java -jar twine.jarWe store this jar in our Git repository (under Git LFS), but you could deploy this JAR to a Maven repository if you wish. I’ll leave that as an exercise for the reader.
Platforms#
So now let’s talk about how we can integrate Twine for various platforms, starting with iOS and Mac…
iOS and Mac#
The way we integrate Twine into Xcode is pretty simple, which isn’t surprising considering that it was originally created to support iOS development.
Create a Localizable strings file in your Xcode project#
We create a folder for your generated strings somewhere in your project. We use App/Resources/generated, but every project is different.
Add folder to gitignore#
We don’t want the generated files to be committed to git, so we need to add the path to our .gitignore.
Call Twine in a Build Phase#
Now we need to add a Build Phase, which invokes Twine during builds. We use the following script:
java -jar path/to/twine.jar generate-all-localization-files \
    strings/mystrings.txt \ # Your Twine strings file
    $SRCROOT/App/Resources/generated \ # The output folder path from above
--format appletwine instead.Bundle the generated strings#
Finally, we just need to make sure that Xcode bundles the generated strings into the package.
Go back to your project’s Build Phases, and find the “Copy Bundle Resources” phase. Click the Add (+) button, and add your generated strings file(s).
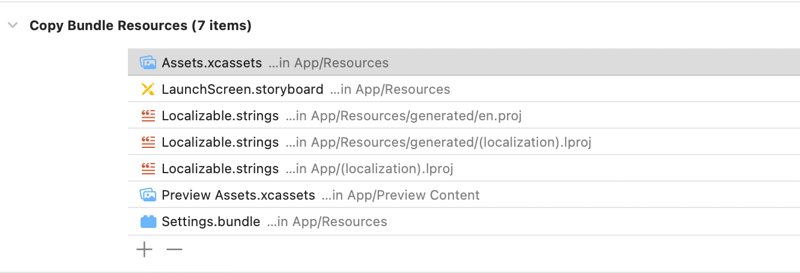
You’re now done.
Android#
Integrating Twine into Gradle is a little tricker, as it requires us to write our own task and integration.
There’s going to be a lot of custom Gradle stuff in this section, but bear with me.
The task itself is fairly simple. We extend JavaExec, which allows us to run another Java executable. The rest is mostly just exposing parameters, and eventually calling Twine’s generate-all-localization-files command.
@CacheableTask
abstract class GenerateStringsFromTwineTask : JavaExec() {
    @get:Input
    abstract val languages: ListProperty<String>

    @get:InputFile
    @get:PathSensitive(PathSensitivity.RELATIVE)
    abstract val twineJar: RegularFileProperty

    @get:InputFile
    @get:PathSensitive(PathSensitivity.RELATIVE)
    abstract val inputFile: RegularFileProperty

    @get:OutputDirectory
    abstract val outputDirectory: DirectoryProperty

    override fun exec() {
        val outputFile = outputDirectory.get().asFile.also {
            // mkdir the parent directory
            it.parentFile?.mkdirs()
        }
        // Twine's `generate-all-localization-files` works by looking at what `values-foo` folders
        // exist, and then generate strings for each of those language folders.
        // We need to create empty folders for each of our chosen languages...
        for (lang in languages.get()) {
            outputFile.resolve("values-$lang").mkdir()
        }

        // Add our Twine jar to the classpath
        classpath(twineJar)

        // Add all of the Twine CLI parameters. Edit this as you require
        args(
            "generate-all-localization-files",
            inputFile.get().asFile.absolutePath,
            outputFile.absolutePath,
            "--format",
            "android",
        )

        // Now invoke Twine
        super.exec()

        // Finally, rename `values-en` to `values` so it acts as the default language
        outputFile.resolve("values-en")
            .takeIf { it.exists() }
            ?.renameTo(outputFile.resolve("values"))
    }
}So we have a Task, now we need to hook it up into our projects.
To make it super easy to ease, we’re going to create a Plugin and Extension:
import com.android.build.api.variant.LibraryAndroidComponentsExtension

class TwinePlugin : Plugin<Project> {

    override fun apply(target: Project) = with(target) {
        val extension = extensions.create("twine", TwineExtension::class, objects)

        pluginManager.withPlugin("com.android.library") {
            // This is equivalent to `androidComponents { ... }` on a library project
            extensions.configure<LibraryAndroidComponentsExtension> {
                // For each build variant, we're going to hook up Twine to export
                // Android strings to a 'generated source directory'
                onVariants { variant ->
                    variant.sources.res?.addGeneratedSourceDirectory(
                        registerTwineTask(
                            languages = extension.languages,
                            inputFile = extension.input,
                            twineJar = extension.twineJar,
                            variant = variant.name,
                        ),
                        GenerateStringsFromTwineTask::outputDirectory,
                    )
                }
            }
        }
    }

    /**
     * This registers our GenerateStringsFromTwineTask task, using the variant name.
     * For debug, this would be `generateTwineDebugStrings`, etc.
     */
    private fun Project.registerTwineTask(
        languages: ListProperty<String>,
        inputFile: Provider<RegularFile>,
        twineJar: Provider<RegularFile>,
        variant: String? = null,
        configure: GenerateStringsFromTwineTask.() -> Unit = {},
    ): TaskProvider<GenerateStringsFromTwineTask> =
        tasks.register<GenerateStringsFromTwineTask>("generateTwine${variant?.capitalizedUs() ?: ""}Strings") {
            this.twineJar.set(twineJar)
            this.inputFile.set(inputFile)
            this.languages.set(languages)
            configure()
        }
}
We can define an extension, allowing modules to configure this in their own build scripts:
/**
 * This allows modules to define parameters by calling `twine { ... }`
 */
abstract class TwineExtension @Inject constructor(objects: ObjectFactory) : ExtensionAware {
    @get:Input
    val input: RegularFileProperty = objects.fileProperty()

    @get:Input
    val twineJar: RegularFileProperty = objects.fileProperty()

    @get:Input
    val languages: ListProperty<String> = objects.listProperty<String>()
        .convention(listOf("en")) // Default to en
}
Once you’ve registered the plugin, you can then start using it in your modules:
plugins {
    id("com.android.library")
    id("com.foo.twine")
}

// rest of build.gradle.kts

twine {
    input = rootProject.layout.projectDirectory.file("strings/mystrings.txt")
    twineJar = rootProject.layout.projectDirectory.file("jars/twine.jar")
}
This probably looks like a lot of code (and admittedly, it is 😅), but very little of the code above is specific to Twine. In fact, the only Twine specific code is the args(...) in the task.
The example above is typical of the Gradle-foo required to hook up a source generating task. You could very easily tweak the code above to call any external Java executable, or even system executable, and hook it up as source to your build.
Compose Multiplatform#
If you’re using Compose Multiplatform (CMP), the great news is that Compose Multiplatform Resources system has been written to be compatible Android Resources files. This means that anything which outputs Android resources files should work here for CMP too, which includes Twine.
To hook this up, we just need to tweak our Gradle plugin above.
import org.jetbrains.compose.ComposeExtension
import org.jetbrains.compose.resources.ResourcesExtension

class TwinePlugin : Plugin<Project> {

    override fun apply(target: Project) = with(target) {
		val extension = extensions.create("twine", TwineExtension::class, objects)

        pluginManager.withPlugin("org.jetbrains.compose") {
            // We're going to use the folder: build/generated/twine-compose-resources
            // Feel free to tweak this to suit
            val generatedDir = layout.buildDirectory
                .dir("generated")
                .map { it.dir("twine-compose-resources") }

            // Now we register our Twine task and hook up the various parameters
            val twineTask = registerTwineTask(
                languages = extension.languages,
                inputFile = extension.input,
                twineJar = extension.twineJar,
            ) {
                outputDirectory.set(generatedDir)
            }

            // Equivalent to compose { resources { ... } }
            extensions.configure<ComposeExtension> {
                extensions.configure<ResourcesExtension> {
                    // Now hook up our custom directory into Compose Resources
                    // so that it picks up the resources
                    customDirectory(
                        sourceSetName = "commonMain",
                        directoryProvider = task.map { it.outputDirectory.get() },
                    )
                }
            }
        }

        pluginManager.withPlugin("com.android.library") {
            // ...
        }
    }

    // rest of code sample
}Downsides#
There are some small downsides to this setup. The biggest is that the developer needs to build the project for the strings to be generated and synced to the relevant project. This means that the workflow needs to be:
- Update text file
- Run build, which generates strings
- Access strings in platform specific way (R class on Android, etc).
We’ve not found it a big deal, as the number of times that you will be making changes to the strings file will be minimal.
Tying everything up#
This post has provided a practical guide to using Twine for multiplatform string management. We’ve covered everything from installation and setup to platform-specific integration with iOS, Android, and Compose Multiplatform.
However, the real power of the techniques described here lies in their extensibility. While Twine served as our example, the core concepts: defining tasks, managing dependencies, and generating platform-specific artifacts, can be applied to any external tool or process.
Whether you’re using a different string management solution, downloading resources from a remote server, or processing images, the patterns outlined in this post can help you streamline your builds and automate complex workflows.
Hope you found it useful!